
Sentaurus Workbench
3. Creating Projects
3.1 Setting Up the Tool Flow
3.2 Saving Projects
Objectives
- To set up and save a new Sentaurus Workbench project.
3.1 Setting Up the Tool Flow
The first step to setting up a tool flow is to create a project.
To create a project:
- Choose Project > New > New Project,
or click the
 toolbar button.
This creates a temporary project with a name similar to g_lnx_2879_0.tmp in the tmp folder that can be viewed in the projects browser (see Figure 1).
![]()
Figure 1. Project directory showing project folder.
To set up a tool flow:
- Under the Family Tree, right-click the No Tools node (see Figure 2) and select Add.
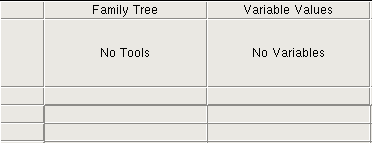
Figure 2. Detail of Project tab showing Family Tree.
The Add Tool (or Tool Properties) dialog box is displayed (see Figure 3).
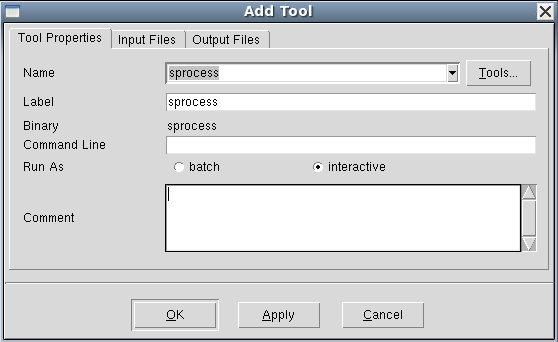
Figure 3. Add Tool dialog box when adding first tool to the flow.
The Label is the name by which this instance of Sentaurus Process is referred. You can use any unique name you want. If you use multiple instances of Sentaurus Process in a project, each instance must have a unique label, for example, sprocess1 and sprocess2. The Input Files and Output Files tabs list all files associated with the tool for reference.
If you want to return to the Tool Properties dialog box for a tool you have already created, simply double-click the tool.
Now, the command file for this tool must be created. Right-click the Sentaurus Process tool icon, and select Edit Input > Commands. The default text editor, SEdit, opens for entering commands.
To customize the text editor used for editing input files:
- Choose Edit > Preferences, or press the F12 key.
- In the SWB Preferences dialog box, expand Utilities > Editor, and choose a text editor.
- Click Save.
Add the following lines to the Sentaurus Process command file with the text editor:
Grid2D
select silicon name=Boron z=1e15 store
implant phosphorus dose=5e14 energy=40
diffuse time=20 temperature=900
struct tdr=n@node@ !Gas !interfaces
Save the sprocess_fps.cmd command file and close the text editor.
3.2 Saving Projects
Before running the project, you must save it.
To save a project:
- Choose Project > Save As > Project.
- Navigate to where you want to save the project under $STDB.
- Save the project as parameters_scenarios.
You can now run the project as described in Section 2.3 Running Projects. There is only one node to run for this project.
Copyright © 2017 Synopsys, Inc. All rights reserved.